Bunting Time!

Hello!!!!

Happy Sunday to you all!  As you know by now, Sunday’s are my absolute favourite day of the week and despite the freeeeeeeeeeeezing cold weather, today is no exception!  It’s freezing I tell you… snow is forecast for Wellington tomorrow… it’s spring.  It won’t snow in the central city of course, just on the hills, but still.  Icy winds galore.  I took my bunting outside just before to photograph it and wow… my fingers froze, I had goosebumps, the lot!  Brrrrrrrr!

But joy of joys, today is bunting tutorial day and I’m so excited!  First let me show you the white bunting… I posted a pic of it in the early morning when it had the light sky behind it the other day, did you see that shot?  Well here it is in full white glory…

It really is quite festive isn’t it!  I used 8ply gorgeous Ashford Tekapo wool and it came out brilliantly.

So shall I get on with showing you what to do to make your own?  I think so…..  First though, do you know what?  I completely forget that I’m a lefty until other lefties comment on how cool it is to see a lefty tutorial!  I hope that it’s not too confusing for righties, and as I understand how difficult it is to follow a tutorial backwards, I suggest you don’t look at the pictures, just read the words!!!!  Aaaah!  Thinking about crocheting backwards makes my brain stop and say “duuuhhh huh?”

First, make a magic ring… do you remember how to do that?  If not, click here and a photo tutorial will pop up, along with instructions on how to do dc2tog.  Also, click here for a tutorial on how to do dc3tog. ….  To begin, ch3, dc2tog (counts as 1 dc3tog), ch2, dc3tog, ch2…. until you have 6 dc3tog each joined with 2ch.  Join with a slst to 3rd ch of original 3ch.

Join next colour into one of the 2ch spaces, ch3, dc2tog (counts as 1 dc3tog), ch2, into the next space *dc3tog, ch 4, dc3tog* (you just made one corner space) ch2, dc3tog into next space, ch 2, repeat ** to make next corner space… continue around until you have three corner spaces separated by 1 dc3tog and 2ch between each cluster.

To make the third round, join the next colour to one of the side 2ch spaces, ch3, 1hdc (counts as 1 dc2tog), ch1, into the same space, dc2tog, ch2, into the next space *dc2tog, ch1, dc2tog* ch2, into the corner space, dc3tog, ch4, dc3tog, ch2 into the side spaces repeat ** and continue around the circle until all spaces are filled and separated with 2ch.

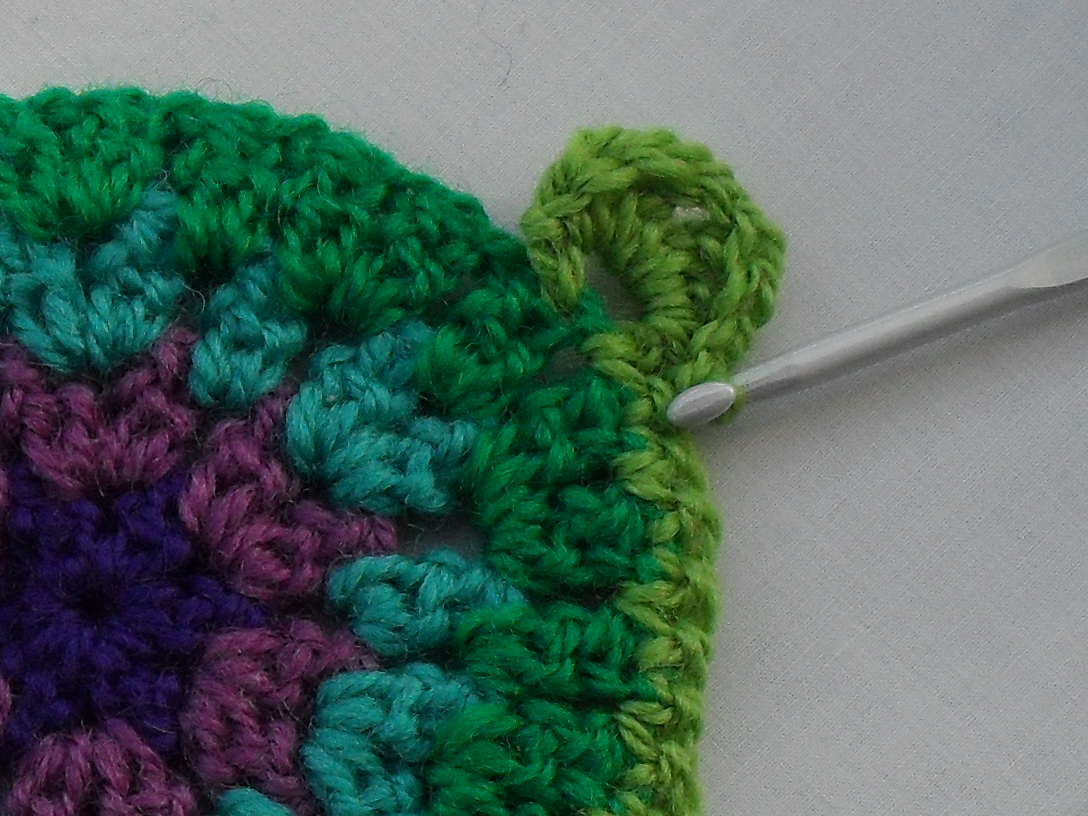
And now for the edging… I love this, it’s so pretty and ruffly!  This edging has a right side and a wrong side, so working with the right side of your bunting facing you, take a new colour- it’s best if it contrasts…. and join to one of the corner spaces with a slst.  Slst into next stitch, ch3, slst into next 2 stitches or spaces, ch3….. until you reach the next corner space.

When you reach that corner space, into the space, make 1 slst, hdc, dc, ch3, dc, hdc, slst, ch3, slst into next 2 stitches, ch3, slst into next two stitches and so on and so on until you reach the last corner space.  Fasten off.

So there you have it, one completed bunt!

Make five or however many you are planning to make!  I’ve been making mine in sets of five, with one colour in the centre, then two of each combinations at the sides and I quite like the symmetry!

Block them!  They look way better afterwards…

And single crochet them together!  I usually ch10, join with a slst, ch 10, sc along the top of bunt number 1, ch5, sc along next bunt, ch 5……..

Voila!

Bunting love….

Beautiful bunting blowing in the icy wind….

Where was Raymond during this photoshoot you may ask?

While he normally loves a good outdoors photo shoot, I found him curled up fast asleep in his bed…. he’s not braving the elements today and I don’t blame him…

OK Lovelies, I hope you enjoyed and understood that…. Let me know if not and I’ll try to explain myself a bit better!  Thank you so much for popping by, have a beautiful day…

I’m off to drag the heater out of hibernation and put on a second pair of socks!

Lots of love from Alice and Raymond XXXXXXXXXXXXXXXXXXXXXXXXXXXXXXXXXXX

Posted in Bunting, Crochet Goodness, Patterns | 34 Comments

dc3tog

Helloooooooo!!!

I’ve prepared a photo tutorial for the very handy stitch dc3tog, or “double crochet three together,” which I love to use in my patterns and I’m sure for those of you who don’t know it yet, you’ll become addicted too!!!!!

When I first encountered this stitch, I closed the book and put it away, but then tried it, and once I got the hang of it (immediately) became a bit addicted to it!  I love the puffiness it creates, so use it, and it’s little sister dc2tog frequently!

I hope this tutorial is useful for you!

Step 1: Yarn over hook, insert hook into stitch and pull a loop through.  Yarn over and pull through two loops on hook.  (So far is is like a dc, but don’t pull through those last two loops on the hook)

 So far, just like a dc…

Step 2: (2 loops on hook) yarn over, insert hook into SAME space, pull through a loop, yarn over and pull through two loops on hook.  (3 loops left on hook)

here’s step 2 completed…

Step 3: (3 loops on hook) yarn over, insert hook into the same stitch, pull through a loop, yarn over, pull through two loops on hook.  (4 loops left on hook)

Step 4: (4 loops on hook) yarn over, pull through all four loops left on hook.

dc3tog complete!

Fantastic!  Great stuff!  Have a practice and I’ll catch you all up tomorrow with my lace bunting tutorial!

Lots and lots of love from Alice and Raymond XXXXXXXXXXXXXXXXXXXXXXXXXXXXXXXX

Posted in Crochet Goodness, Crochet Stitch Tutorials | 14 Comments

Coffee vs Computer

Hellooooooooooooooooo!!!!!

*YAY* I just love sitting down to write a post…. always really, but especially at the moment, because I am studying hard for my exam next week, so my time is very, hmmm…. structured right now, so blogging is a treat and hooking time has been reduced greatly!  Apart from when my brain just can’t take any more learning, I’m thoroughly enjoying the discipline (!) and despite the hours and hours of daily study, I’m making my way through my latest cushion!  It’s HUGE…. but I’ll tell you all about that in my next post!

A few weeks ago I had an unfortunate disaster involving a showdown between my laptop and a coffee plunger full of coffee…..

It was not a happy moment, I’m very attached to my laptop, not just because of the access it gives me to the blog world (tee hee) but also because of the many unfinished essays the live on it…. I’m not one of those legendary people who back things up on USB, no, no, I’m much more spontaneous than that!  So anyway… I went to grab my camera to upload photos of hooky goodness onto beloved laptop and the cord hooked the coffee plunger and pulled it over spilling HOT HOT coffee all over the table onto my leg, who cares about the leg?  It’s my laptop that has plunger grinds all over it!

Breathe.

After the mess was cleaned up, I rebooted beloved laptop and discovered that it was in fine shape apart from a big streak across the screen and a few grinds in between the keys (thank you Universe!) and within a few days the streak had dried and my computer is good as gold.

I wish the same could be said for the carpet…….And we (I) now have a new rule… no plunger coffee next to the laptop.  As well as a big huge brown stain on our new cream carpet, the coffee also managed to ruin the plunger cozy I made for it aaaaaaaaaaages ago, so it was a brilliant excuse to make a new one!  In good old granny stripes!

Oh, and meet Rick, Dick and Prick… or possibly Dick, Prick and Rick…. we’re not entirely sure who is who, but they live next to our front door.  Prick (we assume)… the one on the far right has lovely flowers in summer, I’ll show you in a few months!  I love a good cactus collection, as long as it is just a looking collection, they’re never fun to move anywhere… not even across the room.

I wanted to make this plunger cozy quite carnivally (sp?)…. kind of circusy (sp?) with a fun edging….

Pointy bits are fun!!!  Want to know how I did it?  I’ve done a tutorial for you all…..

Once you’ve finished the piece you want to edge with this fun pointy happiness, I suggest edging it in the colour you want to make the points in sc… to begin the sequence:

slst into first stitch, into the next stitch, *sc, dc, make picot (ch3 slst into 3rd ch from hook), dc, sc.  Slst into next 2 stitches*… repeat ** until the end.

Make sense?

In that slightly blurry picture (sorry about that!) I’ve made sc and dc and am about to do my picot…

There’s the picot, dc and sc all made into the same stitch, ready to slst into the next two stitches.

Now!  because I know there are beginner hookers out there, I’ll write it out stitch by stitch because I remember learning patterns and they can be overwhelming written out like that, so here it is in a more comprehensive way!  (Let me know if you like it like this!)

Slip stitch into first stitch.

*Into the next stitch make one single crochet

one double crochet

chain 3

slip stitch into the third chain from the hook (you have just make a picot stitch)

one double crochet

one single crochet

Slip stitch into the next two stitches*

Between the * and the * is the sequence, so repeat the ** instructions until you have finished the round!

I’m quite partial to this edging… although word of warning, it’s not the best edge for a plunger cozy as it can interrupt the flow of the coffee as you pour it which creates spillage, ha ha *sigh*

OK lovelies…. I’d better get back to the books…. I have been taking sneaky breaks from study and visiting my favourite blogs for a crochet and colour injection and it has been very therapeutic!

See you very soon, hopefully with some great pics of my latest cushion!  I need you to name it for me, for this rather funny cushion exhibition I’m planning!  Something great instead of “green and blue cushion”…. I know you’ll come up with something!

Love and happiness to all of you!  Thank you for popping by!

From Alice and Raymond XXXXXXXXXXXXXXXXXXXXXXXXXXXXXXXXXXXXXXXX

Posted in Coffee Plunger Cozies!, Crochet Goodness, Granny Stripe, My Plants!, Patterns | 27 Comments

Not your average domestic goddess…..

Hellooooooooooooooooo!!!!!!!!!!!!

I am in a reaaaaaaaaaaaaaaaaally happy space right now, as DAYLIGHT SAVINGS BEGAN LAST NIGHT!!!!!!!!!  I don’t know if I can express my love for long evenings after a beautiful sunny day…. tonight after I got home I sat in my rocker after tea watching the clouds float over the sky…. it was blissful.  And, it was 7pm.

Has anyone baked my secret recipe super healthy cake yet???  My frozen banana collection has been taking over my freezer space in a major way lately, so I pulled a few out and popped them in a cake to take to one of my workplaces…..

This one was particularly delish…. I put thinly sliced apple, brown sugar and coconut in the tin before adding the cake mix… it was good!  It didn’t last long…..

Have I told you that KB is gluten intolerant?  I’ve literally been killing her slowly with home-baked goodness for years!  I used to bake her so many cakes and muffins and scones until she could take it no more….. Her health has improved no end since she cut out gluten…. her bones have stopped aching, that’s a good sign!

Meanwhile, I’m not a fan so far of gluten free baking (sorry to all you gluten free people… if you have any good recipes please leave me a link!!!!!!!!!!!!!!!!!!!!!!) except gluten free brownie from Meow cafe in Wellington *YUM* so I have no-one to bake for now.  Hence the banana build up…..

Enough about cakes… in between baking, working and studying, I’ve knitted up a hat that was ordered by a new friend and colleague who wants one for a wee baby about to be born in her family!

Hello Ted!  It’s you again!  You’re becoming the star of my blog!  Raymond who???

Isn’t that the cutest picture of Ted?  Would you like to hear Ted’s life story?  Ted belongs to KB who is the youngest of six children… she has kept a few of these toys and they are much treasured by us now.  Ted began as a companion for KB’s oldest brother which means he is about 50 years old (sorry to divulge your age D!  I hope you never read this!!!)  and worked his way through six children.  He is now having a revival as my baby hat model and has been enjoying this job since December last year!

KB accused me of ripping his smile off.

I was quite hurt… she said his smile was fine before he became my model, but I just cannot accept that accusation! 

Ted has a few friends I will introduce you to one day…. they’re lots of fun, but no good for modelling which is why you haven’t met them yet!

So my Mum loved my cushion from the last post so much she has decided she wants me to do a cushion exhibition in her shop…  I’m going to name is “Eat your heart out Grandma”…. so I’d better go…. It seems I have a bit of a deadline now!

Lots and lots of love, and thank you for the lovely feedback on my cushion!  I’m glad we all agreed on the layout!!!

From Alice and Raymond XXXXXXXXXXXXXXXXXXXXXXXXXXXXXXXXXXXXX

Posted in Baby Hats, Crochet Flowers, Crochet Goodness, Fooooooooood!, Knitting Baby Clothes!, Knitting!, Other Ramdom Stuff, Ted! | 16 Comments

Lotus Mandala Prayer Flag joy

Helloooooo!

Thank you for popping in to visit us this morning!  I hope you’ve enjoyed your week and are having a relaxing Sunday!  Despite the rain and mist, it’s a lovely cozy day here, and not at all cold which is great.


I tried to photograph the misty hills for you, but the flash caught the rain drops!  Don’t they look magical?

I’ve been up since 6am as I had to drop KB off at work, then went to the vege market, as I do on a Sunday morning!  I’m completely knackered after a busy week and a terrible night’s sleep which involved getting woken up by some drunk boys having a massive screaming match over some girl- lots of the F word and another neighbour intervening- phew!  Then I had a totally crazy dream that I was trying to buy chocolate while walking on really tall stilts.  So I’m having one of “those” mornings today… I was driving through the city and turned a corner and *CLONK* something hit the side of my car really loudly…like I had run over a big rock and it had smacked up into the bottom of my car… *boom boom boom* goes my heart, as it’s darkish and raining, but I managed to get to the market and home in one piece… then walked through the front door and *woosh* did one of those slips that nearly results in the splits and just about dropped my bags of veges everywhere!  I decided I absoloutely needed to sit down in my rocker, stat, before I broke something, or myself, and have a rest and relax before I do anything like put the veges away!  Luckily I managed not to drop and destroy these beautiful pieces of happy!


Oh how I love pink, the whole spectrum of pinky goodness never fails to make me feel loving and happy. 

So yay, here I am, excited to be spending a little time in my happy place, sorting out the tutorial for my new favourite thing, the lotus mandala prayer flags!  I’ve had a few people comment here and on Ravelry that they’re watching for the tutorial, and wow, thank you! That makes me feel really good, it was awesome to get such a positive response!

I whipped up another set on Friday morning, they only took me a few hours, and I apologise for the terrible lighting in my photographs… my photos turn out best when the sun is shining, which it doesn’t always, so some of them get a bit dark.

Here’s the finished product….

Oh I love them!  I made them with 8ply wool and a 4mm hook.  They’re made mainly with dc2tog stitches, a quick reminder of how to do that is:

Yarn over hook, insert hook into stitch, pull through loop, yarn over, pull loop through 2 stitches on hook, yarn over, insert hook into same stitch, pull through loop, yarn over, pull loop through 2 stitches on hook (three left on hook) yarn over, pull loop through all three stitches on hook.

To begin, we are going to make a magic ring, ch2, 1dc (counts as 1dc2tog), ch1, dc2tog, repeat 4 more times until you have 6 dc2tog, each separated by 1ch.  Join with a slst to 2nd ch of original 2ch. Click here and a magical window will pop up with a photo tutorial for how to do this, it’s the same as the centre of the grandala square.  My advice?  Make all five at once and weave in the ends as you go!!!

Change your colour, and bringing new colour through from the back, join with a slst, ch2, 1dc (counts as 1dc2tog), ch1, into same space, dc2tog.  Ch1, into the next space, dc2tog, ch1, dc2tog… continue around the circle until each 1ch space from round 1 is filled with 2dc2tog each separated by 1ch.  Join with a slst to 2nd ch of original 2ch.

Weave in those ends now!  Go on!!!  Do it!  It will make the whole process more fun if you don’t have that big job to do at the end!!!!!

OK, so next round is pretty much the same as the last round, except in every second 1ch space, just do 1dc2tog.  See the pic?

And the next round is exactly the same as the last!

For the outside, join the last colour with a slst and ch1.  Now sc into each stitch around the edge until you get halfway around.  ch3, and sc into the next space.

Turn, and into the 3ch loop, sc, hdc, dc, ch1, dc, hdc, sc.  Slst into closest sc, and turn again.

Slst into the three stitches and slst into the 1ch space, then make a picot by chaining3, then slst into the first ch, slst into the smae space and slst into the three stitches back to the beginning.  Slst into the next stitch and continue with sc around the edge.

And viola!  There you have it!  I hope that made sense!  Let me know if I talked you into a tangle!

When you have made five, back them with felt by cutting circles to fit and loosely sewing onto the back.  I tried to be lazy and not do it with this set, but they flopped in a terribly unattractive way, so back them I did!

To join them, I ch10 then slst into a loop, ch15, join one mandala with 3sc along the top, ch20, join the next one…. until I had a nice even row of beautiful hanging mandalas!

Here’s where I hung them, here’s a picture of a spot in my house, which I’ll admit here, is comfortably, cozily cluttered with wonderful things!

You can see through there into my kitchen, the slow cooker is cooking some delicious soup!

So I was reminded that it’s international crochet day today by a few blogs and how exciting is that!!!  here’s what I’m going to get up to for the next little while!

Continuing work on my latest grandala square cushion!  I’m loving looking around blogs and seeing grandalas popping up!  I thought I’d try hooking one in a different colour scheme to my usual too-bright-to-look-at styles!  KB loves it and I think I do too….  Later I’m off for a visit to my parents to get some wool sorted for Tuesday where I’m going to learn injection dying.  I’ll be sure to take my camera and show you all the process too!

Lots of love to you wonderful and kind people, I’m so looking forward to having a nice catch up of all of your blogs which I’ve been having withdrawals from as I’ve been working, and have so missed soaking up all of your loveliness…

Have a lovely Sunday,

From Alice and Raymond XXXXXXXXXXXXXXXXXXXXXXXXXXXX

Posted in Bunting, Crochet Goodness, Patterns, Prayer Flags | 43 Comments

Grandala Square Tutorial!!!

Hello Lovely People!

I hope you’re all having a wonderfully relaxing or exciting weekend!  *YAWN*  I’m completely knackered today after a couple of days of work and lots of hours essay writing!  It’s mid-afternoon and I’m craving a strong coffee and carrot cake… but I’m being completely restrained and drinking a hot lemon and ginger and eating an apple (boring).  I know if I have a coffee I’ll be awake all night and need 4 to get me started in the morning, then the sleep will get out of whack and all of a sudden I’ll be a jittery mess!  Raymond and I are trying to relax, him in front of the heater and me in front of my laptop.  It’s a crazy windy day here, my house is shaking like it’s about to blow off the side of the hill I live.

Thank you so much, you lovely ones who sent messages of love and concern regarding the earthquake on Saturday morning!  You are truly so sweet and I felt very blessed to have such wonderful people in my life.  The earthquake was in Christchurch which is in the South Island, down the right there…

KB and I live in Wellington, at the bottom of the North Island which was unaffected by the quake… I felt it though, the jolt woke me up at 4.35am and my mirror went click-click-click-click-click… for those of you who have been in earthquakes, you know what thats like!  You lie there in fearful anticipation… was that just the warmup?  Wow, is Mother Nature an amazing force.   So Christchurch and Canterbury have suffered extensive damage… I felt sad looking through the pictures on this site, the ones that shocked me most were the railway tracks and the petrol tanks lifting up out of the ground.  Luckily *luckily* as far as I know, no-one was killed as the quake happened when everyone was in bed, what a relief… I shudder to think of it happening at 3pm when schools had finished or anything…  So I’m sending much love and kind thoughts to Chrishchurch residents and all of the people rallying around to get the city back into order, and being reminded to send much much love to the people of Haiti, or New Orleans, or anywhere else that has been affected by forces of nature beyond their control.

So these things said and done, shall we begin with the exciting process of the Grandala square tutorial!   I just love making these squares and have in fact been making many!  For those of you who have just found my blog, click here to see the process and how many attempts I took before I was happy with this pattern!  I’m thrilled to share the pattern and can’t wait to see what beautiful things you all create with this!  I used 8ply wool and a 4mm hook as per usual!

 My very patient sister helped me with a photo tutorial for a *magic ring!!!!*… what a process, the first photos were blurry, so we re-did them, I think this time she decided it was a challenge to get those photos just right for my blog!  Little sisters are the best, they’re usually up for anything!  So for those of you who have not yet tried a magic ring, here we go!  We are going to begin with the first round of the square!

Ooh, remember now, I’m a lefty, so for you right handers out there, just mirror me!

To begin, wrap your wool around your index finger, with the tail end to the front, closest to your thumb.

Does that make sense?  The tail isn’t showing in that pic, but it’s the right thread.  Insert your hook through the loop and bring a loop through the ring.  (I’m hoping this picture will paint 1000 words here!)

Chain 2, 1 dc into ring.  (Counts as 1 dc2tog).

To do dc2tog: yarn over, insert hook into stitch, yarn over, pull loop through, yarn over, pull loop through two loops on hook, yarn over, insert hook into same stitch, pull loop through stitch, yarn over, pull loop through two loops on hook, yarn over, pull loop through all remaining loops on hook.

That one was blurry!  Bad sister! *ch1, dc2tog* repeat four more times, until you have 6 dc2tog in total. 

Here’s where the magic ring gets magic!  Soo how it has a gap between the first dc2tog and the last?  Well, take that tail end and gently pull…

And voila!  It’s closed!  Now ch1 and join with a slst to 2nd ch of original 2ch.

There we go!  Easy peasy!  We had to hurry at the end there, my hands were turning an unattractive shade of purple because of the cold! 

So there’s the centre of your mandala.  Now, I finished this tutorial at home, so we’re having a location change here!  Here’s the centre again!

 Change colour.  Bring new colour up between the dc2togs and into the same space, ch 2, 1dc (counts as 1 dc2tg), ch1, dc2tog.

Ch1, into next space, dc2tog, ch1, dc2tog, ch1.  Repeat around the circle until each of the spaces from round 1 are filled with *dc2tog, ch1, dc2tog* and you have 12 1ch spaces between dc2tog.  ooh, I hope that makes sense!  I want to try a video next time!  It’s so much easier to show you what I’m talkng about!

I love those little dc2togs, they’re so compact and sweet!  I’m very excited by their presence in my square.

Next round, change colour and bring new colour up in one of the 1ch spaces.  Ch3, (counts as 1dc) 2dc into same space.  Ch1, 3dc into next 1ch space.  Continue around the circle until each of the 12 spaces are filled, ch1 and join with a slt into 3rd ch of original 3ch.

And there you have your mandala!  Now it’s time to make it into a square.  I’ve chosen natural fibre here in order to show the lovely circular effect… black or white would look amazing too.  We’re going to need trebles (tr) and half trebles (htr) here, so if you’ve never done these before, here’s a quick how-to.

Half trebles:  Yarn around hook twice, insert hook into stitch, pull a loop through, yarn over, pull loop through 2 loops on hook (3 left on hook) yarn over, pull loop through all three stitches on hook.

Trebles: Yarn over hook twice, insert hook into stitch, pull loop through, yarn over, pull loop through two loops on hook, yarn over, pull loop through two loops on hook, yarn over, pull loop through all remaining loops on hook.

So bring the new colour up in one of the 1ch spaces and ch3 (counts as 1dc), 2dc into same space.  Ch 1, now we’re creating a corner, so into next 1ch space, 2htr, 1tr, ch3, 1tr, 2htr, ch1.  The circle needed that extra space in the corner so we use the trebles.  3dc into next 1ch space, ch1, 3dc into next 1ch space, ch1 then repeat corner sequence.  Now, continue around the circle in the same fashion as you would a granny square, just using the tr and htr in the corners!

And there we have it, a Grandala square fit for a blanket or cushion or whatever you want!

I do believe that granny squares are one of the most difficult things to photograph!  Here’s a close up of that mandala goodness!

And a glimpse into the colourful wonderment that is my latest WIP!  It’s so bright, as usual, my camera didn’t want to photograph it very well!

As you can see, I’ve used my favourite natural fibre to egde the squares to really make those mandalas pop out of the square.  I’m loving them, I hope you do too.

OK, that’s all from me for now, I must, must, must go and finish my essay!  Oh, but before I do, have you ever seen a cat with six toes?  I have, my sister has one named Squid who is the loveliest little sweetie ever, she’s tiny and her fur is so silky soft!  I got a picture today showcasing her full range of digits!

They’re like the cutest little pair of mittens!  I love her so much!

OK then, I’m going, I’m going!!!

Lots of love to you all, from Alice and Raymond XXX

Posted in Crochet Goodness, Grandala Square, Granny Squares, Patterns | 63 Comments

The intricate business of creating a coffee plunger cozy!

Hellooooooooooooooooooooooo!

I hope you’re all enjoying your sunday… many of my blog friends will be fast asleep (or out on the town!) as I type this… I was reflecting the other day, on how amazing it is to meet and keep in touch with so many people from all around the world, and follow their lives.  It makes me realise how isolated we are all the way down at the bottom of Mother Earth, and I am thoroughly enjoying watching your seasons change, I feel so much more… connected!  It’s great.  I hope you are all enjoying watching my winter turn into spring and not feel too many regrets about the changes you’re going through…  I promise to post many pictures of sunshiney happiness to warm you up on the inside in a few months time!

No sunshiney happiness is happening here today though!  It seemed like it might be a nice day, but by 8.30am a random rainstorm had happened, a gust of howling wind blew through (it has gone now) and the greyness set in.  KB and I hung out together all morning, all our windows steamed up… until we couldn’t take it anymore!  We got in the car and went to the supermarket… even though Sunday afternoon is the WORST time ever to go to Pak’n’Save!  We managed to escape without uttering too many swear words, and our cabin fever was gone!  Home we came as fast as we could!!!

I’m going to post the spoils of my morning stuck inside…  I didn’t make ALL of it today, some was last night too!  I’m not a crochet machine!  I really, really wanted to show you my crazy stripes hat, but I want to take the pictures outside, so that will have to wait until the rain has subsided.

I’m crazy about the colours I used, have you noticed by now that I totally get off on bright and beautiful colours!

Granny stripes have been happening…

And a matching mandala too!

Last night I really felt like getting some mandala action happening.  I was going to make one in many different shades of green, but it created itself into dazzling blues and turquoises and I’m pleased!  I love it! 

A couple of weeks ago, KB found a BRAND NEW Bodum coffee plunger at the op shop and snapped it up for $8 (yessssss!) and we were happy about that because the one we bought a few months ago had already broken.  However, this one is huge and the skull coffee plunger cozy I made the old plunger, didn’t fit this new one, so I decided to hook one out of these stunning colours this morning.  I cannot stand luke-warm plunger coffee, it’s bad news in my world, and plunger cozies work a treat.  So how about a wee tutorial?

I’ve made so many things from the Lovely Lucy’s granny stripe pattern I’ve remembered it off by heart!  It’s wonderful, thank you Lucy!  To begin, I made a piece to fit my plunger, (make it in granny stripes or whatever you prefer…)

 … making sure it didn’t meet at the back, then edged it in a different colour with single crochet…

Then I edged this piece with a pretty shell stitch… It’s a bit more delicate than the big shell stitch I usually use… after I joined my single crochet round with a slip stitch, I chained one, then into the next stitch, 1 sc, 1hdc, 1 sc, slip stitch into the next 3 stitches… repeat around and around and around… Lovely!

By this stage in the creative process I was getting very, very excited!  I’ve discovered that coffee plunger cozies stretch, so I created a device to stop them slipping off the plunger!  (It’s so technical  ha ha)… check it out!

Simple it seems!  But so utterly necessary!  I joined the wool with a slip stitch to the top of the cozy and chained a few stitches until it JUST reached the other side.  Remember if you make one, it will stretch!  I slip stitched it to the other side and single crocheted back across the chain to make it nice and strong.

THEN!  (It’s such an involved process isn’t it!)  Then I made the tie-up part at the back.  The first two plunger cozies I made (this is my 4th) I used buttons and loops which looked so pretty!  But when you are constantly taking the cozy off to wash the plunger, you get really p**sed off with the pretty buttons and loops, so I now create a tie on either side of the cozy which works like a charm!

Ta daaaaa!!!!

This is turning into quite a long post!  I’m sure you noticed that the mandala was the same colour as the plunger… well, I’m quite partial to matching things, and thought that it might be nice to have them matching for coffee drinking occasions!

I LOVE this mandala.  I’m wondering if it’s my favourite yet, or if that’s just because it’s new.  KB is a very talented painter, and she taught me about blending colours.  So I took it on board and have been blending my wool in the same way she blends her paints when I make my mandalas. 

Here’s one of that lovely mini shell stitch…

And one more gratuitous shot of mandala-licious-ness!

Getting home from the supermarket was the best… especially sitting down for a coffee and testing it all out!

Complete and utter fun!

I hope you enjoyed that colour therapy!  I’m off to upload them onto my ravelry page! woo hoo!  Ravelry is the best!   Then after that, I’m going to be highly disciplined!  I am giving a 30 minute (plus 15 minutes for questions) presentation tomorrow at 9.15am for one of my polytech classes.  I get reaaaaaaaaaaaaaaaaaalllllllllllllllllllllllllly nervous when I have to do public speaking, so I’m going to get myself well prepared and practiced!  And start imagining all of my classmates in their underwear… or maybe not…

Have a lovely beginning to your week everyone, and thank you so much for popping in,

lots of love from Alice and Raymond XXX

Posted in Coffee Plunger Cozies!, Colour Therapy!, Crochet Goodness, Granny Mandala, Patterns | 53 Comments

My Mum’s sheep collection.

If you’re thinking by now that I’m a yarnophile (you’re right by the way…)… you should meet my mum.

She hearts wool soooooo much, that she even grows it on her very own collection of sheep.   She tells me she can knit in the dark too… I’ll have to see it to believe it…

So I was out visiting my parents, and had to introduce you to my Mum’s flock of sheep.  She likes dark wool, so most of her sheep are dark… although… as you will see, a white ram got into the paddock and tupped one of her ewes!  White lambs!  That’s how you can tell when there is a hole in the fence that separates your paddocks from your neighbours.

If you zoom in very very closely there, you can see them running down the hill… they can hear my Dad calling them and rattling sheep nuts.

Those sheep love my Dad and his nuts…

She’s got a lot of sheep… according to my Dad she has “too bloody many,” but I think thats what all husbands think about wives who collect things…  Most of her sheep are tame-ish so they’re a nice flock.  Some are really old too.

And that’s just the sheep in the top paddock!!!  All the lambs are down the bottom!

Over on those hills, in front of the big row of trees they can hear the nuts and they’re coming!

Cue: Awwwwwwwwwwwwwwwwwwww little lambs!  There’s that white one… in fact, at the time I took this shot, it’s twin was right up on the hill, it got left behind.  We could hear it crying like crazy, but it managed to find it’s way over a creek and into the pen!

Action shot of said lamb racing up to it’s mother!

They’re a friendly bunch, especially when there are treats involved!  Oh and check out this sheep… whever did the shearing on this guy must have had a sense of humor… he looks like a teddy!

And one last shot… I think this is my Mum’s favourite sheep of all…

So there’s a little insight into my unusual family and where I get my wool obsession from!  It seems it is genetic…

Hope you enjoyed!

Lots of love from Alice and Raymond XX

Posted in Other Ramdom Stuff | 16 Comments

A mistake!

It’s me again!  tee hee!

I’ve been working on little wee projects lately, which deserve a whole post in themselves… I think sometimes that I’ll save some of my work for posts in the future when I’m not being so productive, but creativity is a process don’t you agree?  I find that I’ll create something, and LOVE it!  Be obsessed with it’s beauty!  Then a few weeks later, I’ll have improved my skills and look at the original and think “gosh!  what c**p!”

So when I was creating my Granny Mandala pattern, I made a mistake which became something quite cool actually!  And just in case anyone would like to have a go, here is the pattern!

Granny triangles!!!  Did you see kate at Fox’s Lane’s wall of pot holders?  I saw them and fell in love with the look, so when I discovered how to make a triangle, I decided to have a go at making a pot holder for the wall above my stove!  The first of many, if I’m inspired enough!

So here is how I made it.  I’ve only made one so far, so if you have a whirl and find a mistake in my pattern, please let me know and I’ll update it!  Every time I try to write a pattern, I get myself so hopelessly muddled!  So once again, I’ve written in a different colour, some easier for me to understand guidelines!!!!!

Round 1: ch4, join with slst to make a ring

Round 2: ch3 (counts as 1dc) 8dc into the ring.  Join with a slst to 3rd ch of original 3ch.

You’re increasing in this round, so double “grannies” each time. You want to create 3 lots of doubles which have a 3ch space between, to create a corner, and 1ch between each set of doubles.

Round 3: ch3, then between the stitches, 2dc, ch3, 3dc into the same space as you would to create a corner in a granny square.  Ch1. Skip 3 dc stitches from round 2, 3dc, ch3, 3dc into same space, repeat once more, ch1 and join with a slst to the 3rd ch of original 3ch. 

From here on in, you’re working it like a granny square just with 3 corners instead of 4, and making sure you make a 3ch gap in between each “granny” in each corner to allow room for turning.  Then, 1 “granny” in each space down each side of the triangle.

Round 4:  Ch3, 2dc into 3ch space, ch3, 3dc into same space. (You have just created a corner here) Ch1, 3dc into next space, ch1, into the next space 3dc, ch3, 3dc, ch 1, 3dc into next space, ch1, into next corner space, 3dc, ch3, 3dc, ch1, into next space 3dc, ch1 and join with a slst into 3rd ch of original 3ch.

Round 5….. onwards!  Repeat round 4 as many times as you like!

Edging: I just did a round of sc, then another round of sc with a ch loop on one of the corners to hang it above my stove.  I’ve just made a pretty little shell edging for a mandala which I’m going to show you later on in the week, and that would look lovely on one of these, so I may need to alter it!

I’m quite thrilled with this new discovery, and hope you like it too!  File it away for when you’re bored with all your WIP’s and want a new and fun project to make in an evening!

Enjoy your day,

Lots of love from Alice and Raymond XX


Posted in Crochet Goodness, Patterns | 27 Comments

I love Sunday

Hello!  It feels like AGES since I’ve posted… I think it has only been 4 days, but it feels like longer…  The reason?  Well, sadly my holidays finished (*sniff*) and I’ve been filling my days with classes… practical placement hours… WORK!  I’ve got a very busy few weeks coming up, with class 5 days a week (9-3.30, just like school!), practical work and my job thrown in for good measure.  So not so much wooly goodness will be happening, but I’m sure I’ll squeeze in some time for creative pursuits!  In fact, this Wednesday, I am attending my first ever meeting of “the crafty foxes,” a group of creative wonder-women who meet in the city twice a month.  I’m so excited, and will tell you all about it on thursday!  And once those few busy weeks are up, a week of wonderful exciting happiness will begin which I’ll tell you all about in good time!

It’s sunday again, my favourite day as I work on friday and saturday, so am very ready for a day off on sunday!  Plus, its vege market day, so I was there in the near-dark again this morning, stocking up on all my fresh goodness!  I’ve been cooking up a storm this morning, getting dinners for the week ready and freezing them, enjoying all the fresh produce I purchased today!  When I was leaving the market, I still had some coins, and as I walked past the plant stall, I spied these!  I was so greatly inspired by Vanessa’s lovely garden post yesterday, it made me yearn for some flowery prettiness at my house!

I bought a few and brought them home to put in a pot, they’re living on my lounge table right now, and they make me feel happy every time I see them!  And at $1.50 per plant they were a steal.  After the market, I saw them in the supermarket for $3.97 per plant… such is the difference between market and “super”market in Wellington!

I really really really hope they live… I’m the world’s worst gardener, which upsets me, as I want to grow things, and confuses me because my moon is in Taurus and Taureans are meant to have green thumbs… (to find out your moon sign click here!)  I have been known to kill a parsley plant which lived on my windowsill… ) So wish me luck, because they are just so pretty!

Enough blathering… I’m going to share today, my dairy-free healthy cake recipe.  *GASP*  I swore I would never ever share it, because I bake one for every event I go to and people LOVE it because it’s healthy and delicious!  But I’m sharing it now because I get so much inspiration from my lovely lovely blog friends, and the depth of sharing in this community has blitzed any baking selfishness I have suffered from!

It’s my own secret recipe, and it’s hard to share, because I have no recipe, and I never measure the ingredients, and it changes every time, but I’ve done my best!  So get a pen and write this down!

I use the same recipe whether I bake cakes or muffins, it’s very multi-purpose!

Either grease your tin with marge, or make some muffin tin liners with greaseproof paper… I’m doing muffins today because I can’t be bothered scrubbing a cake tin.

Into a bowl, add 1 free range egg, 1 cup of raw sugar and 1/3 cup of oil.  Olive, rice bran, as long as it’s not that vile canola, you’re good!  Then add 3 heaped teaspoons of cinnamon.  (yes it’s heaps but tastes so good!)  Mix together well.

Now for the fruit.  Use anything that needs using.  In these muffins I’ve put 2 bananas (because my frozen banana stash in my freezer is getting out of control!) and I’ve grated 3 apples.  Put in heaps of fruit because these are meant to be healthy muffins to be enjoyed a lot!  So maybe 1 1/2 cups of fruit?

Now add a cup of other stuff.  This can include nuts, dates, sultanas, dried apricots, linseeds, sunflower seeds, just whatever you have in your cupboard that needs using.  I’ve added nuts because I cleaned out my cupboards yesterday and found about 5 packs of nuts with about 4 nuts left in each one ha ha, and dates because I LOVE dates!  In the last batch I made I added sunflower seeds that I’d had in my sprouter, and they were GOOD! 

Then add 1 cup of rolled oats and 1/2 cup of bran.

If you’re thinking, wow, this is going to be a big cake, you’re right, but that’s the point!  So, mix all that in, then add 3 heaped teaspoons of baking powder, 1/2 cup of plain white flour and 2/3 cup of wholemeal flour.  Then wet the mixture with soymilk until it is reasonably sloppy, it needs to be nice and wet so the cake stays moist.

Add to cake tin or spoon into muffin trays!  Embellish with some dark chocolate if you’re lactose intolerant, if you’re a milk drinker, add a big dollop of cream cheese, or chocolate YUM!  And bake at 180 degrees C until baked.  I didn’t time these, but when they look cooked, pull them out 🙂

Wait until they have cooled!  You must!  They taste so much nicer cool!

I took 2 muffins as a gift for my downstairs neighbour… she came to the door with Raymond in her arms, so I won’t see much of him today!  She uses her heater more than us, so he much prefers visiting her!

So now I’ve done my cooking and baking mission, I have the rest of the day to begin about 4 different assignments, do some yoga and continue with my latest WIP!

I’m making that beautiful touchyarn my mum gave me into a hat for ME!  Yes yes… it’s on straight needles, I am not skilled with circular needles and sew up seams flawlessly!  Please enjoy the colours!  I am!  After I’ve had a go at that, I’m going to begin a crochet scarf in a cool new fan stitch… watch this space!

Have a lovely and wonderfully magical day!  I’m off to make a coffee and eat a(nother) muffin!

Thank you so much for stopping by!  I love your visits and comments, you’re all just the best!  Love and blessings from Alice and Raymond XX

Posted in Knitting!, Other Ramdom Stuff | 15 Comments